US visa photo requirements for the DS-160: 600×600, 240KB and why uploads fail
The DS-160 asks for a digital photo, and its photo check is strict: a picture that looks fine to you can be refused because it is 610 × 400 pixels, 260KB, or your head is a little too small in the frame. This guide puts the official rules in one place, turns the percentages into pixels and explains the one rule almost nobody mentions: a photo can also be compressed too much.
Make your DS-160 photo →Square 600×600 JPEG under 240KB, with the head oval and eye band drawn on the frame. Runs in your browser.
The rules at a glance
| Rule | Requirement |
|---|---|
| Shape and pixels | Square. At least 600 × 600, at most 1200 × 1200 pixels |
| File | JPEG, 240 kB or less |
| Colour | Colour (24 bits per pixel), sRGB. Black-and-white is refused |
| Compression | Compression ratio of 20:1 or less |
| Head size | Top of the hair to the bottom of the chin: 50–69% of the image height |
| Eye height | 56–69% of the image height, measured up from the bottom |
| Recent | Taken within the last 6 months, showing how you look now |
| Background | Plain white or off-white |
| Pose | Full face, facing the camera, neutral expression, both eyes open |
| Glasses | Not allowed since November 1, 2016 (rare medical exceptions with a signed statement) |
| Hats | Not allowed unless worn daily for religious reasons, with the full face visible |
| Editing | No digital changes to your appearance, not even removing red-eye in an editor |
Photos copied or scanned from another official document, such as a driver's licence, are not accepted either.
The percentages in pixels
"50–69% of the image height" is hard to check by eye. On the two allowed extremes it works out like this:
| Image | Head height (hair to chin) | Eye line, from the top |
|---|---|---|
| 600 × 600 | 300–414 px | 186–264 px |
| 1200 × 1200 | 600–828 px | 372–528 px |
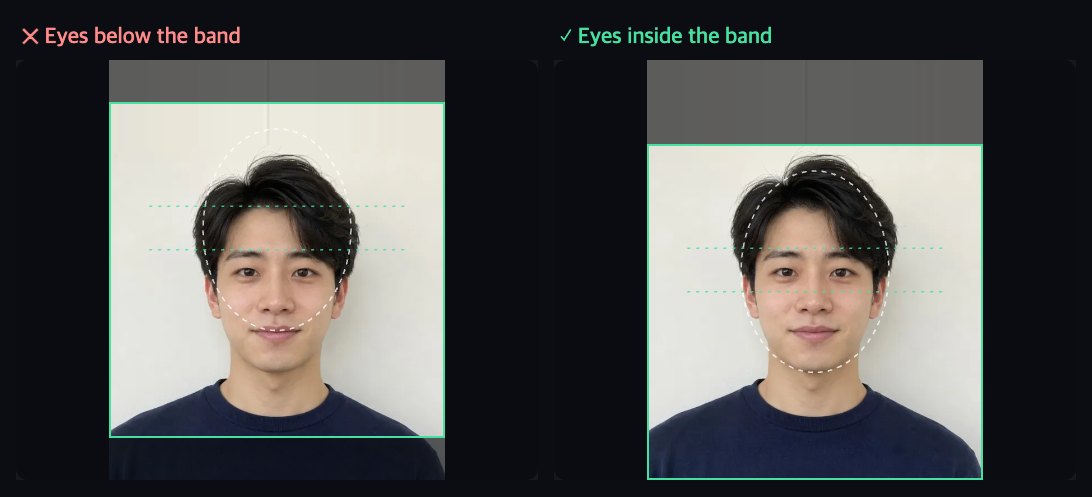
The eye line is easier to read from the top: 56–69% up from the bottom is the same as 31–44% down from the top. On a 600-pixel photo your eyes should sit roughly a third of the way down, not in the middle. Photos where the eyes are in the middle of the square are the most common near-miss, because that is how most people centre a face.
The 20:1 rule: why a tiny file can fail too
Most advice stops at "under 240KB", but the digital image page also says the compression ratio should be 20:1 or less. The compression ratio is the size of the raw image divided by the file size. A raw 600 × 600 colour image is 600 × 600 × 3 bytes = 1,080,000 bytes, so:
| Image | Raw size | Allowed file size (20:1 to 240KB) |
|---|---|---|
| 600 × 600 | 1,080,000 bytes | 54–240KB |
| 1200 × 1200 | 4,320,000 bytes | 216–240KB |
Two practical lessons follow. First, 600 × 600 is the easy size: it has a wide window, while a 1200 × 1200 photo has to land in a 24KB gap. A bigger photo is not a better photo here. Second, "compress as much as possible" is the wrong instinct. Squeezing a 600 × 600 photo to 30KB goes past 20:1, and heavy compression is also what makes skin blotchy and edges blocky.
Smooth, retouched photos compress so easily that even a high-quality save can land under 54KB. When we tested SlimIO with a retouched-looking sample against a plain wall, a high-quality JPEG (quality 92) came out at 39KB — about 28:1. The US visa preset now raises the quality for photos like that until the file is at least 54KB; the same photo comes out at 58KB, about 18.6:1, still far under 240KB.
Scanning a printed photo: 2 × 2 inches at 300 ppi
If you have a printed US visa photo, the rules are 2 × 2 inches (51 × 51 mm) scanned at 300 pixels per inch, which gives exactly 600 × 600 pixels. Be careful with photo studios that sell a "5 × 5 cm" print: 5 cm at 300 ppi is only 591 pixels, just under the 600 minimum. Scan at a higher resolution and crop to the square, or ask the studio for the digital file. The arithmetic behind this is in KB, pixels, cm and DPI explained.
Taking the photo yourself
The State Department recommends a professional photo service and warns that many phone and webcam photos are not good enough. If you take it yourself, these remove most problems:
- Background: a plain white or off-white wall, nothing behind your head.
- Light: even light from the front, such as facing a window. No shadow on your face or on the wall behind you.
- Camera: someone else holds it at eye level, a few steps away, then you crop. An arm's-length selfie makes the nose look bigger and is often tilted.
- You: no glasses, hair off the eyes, neutral expression, both eyes open, everyday clothes (no uniform).
- No filters: phone beauty modes and portrait blur count as altering the photo. Turn them off.
Making the file with SlimIO
- Open the US visa photo tool. The 600 × 600 crop and the 240KB limit are already selected.
- Add your photo. A green square frame appears with a dashed head oval and two dotted lines for the eye band.
- Drag the frame and use the zoom slider until your head fills the oval and your eyes sit between the dotted lines.
- The result appears right below and follows the frame as you move it. It shows the pixels and file size — for our test photo, 600 × 600 and 58KB. Check them and click Download.
The photo is processed in your browser and never uploaded, and location data (EXIF) is removed. SlimIO only crops, resizes and compresses. It does not whiten the background or retouch your face, because the rules don't allow that. The State Department also offers its own free photo cropping tool that makes a 600 × 600 square.
Why the upload fails, and the fix
| Problem | Fix |
|---|---|
| File over 240KB (phone photos are often 2–5MB) | Compress to under 240KB at 600 × 600 |
| Not square, or under 600 pixels | Crop to a square; start from the original photo, not a messenger copy |
| Head too small, lots of shoulders and wall | Zoom in until the head is 50–69% of the height |
| Eyes in the middle of the photo | Move the frame down so the eyes are 31–44% from the top |
| PNG or HEIC file | Save as JPEG |
| Grey or patterned background, shadows | Retake the photo against a plain white wall in even light |
| Glasses, hat, filter | Retake without them |
If it still won't upload
You can finish the DS-160 anyway. The State Department explains that if your confirmation page shows an X instead of your photo, the upload failed, and you should bring one printed photo that meets the requirements, with the confirmation page, to the embassy or consulate where you apply. Check that post's instructions first. If the confirmation page shows your photo, the upload worked and no separate photo is needed. Some posts ask for a printed photo at the interview even after a successful upload, so read your appointment instructions.
Other forms want different numbers: Korean, Indian and many other applications use 3.5 × 4.5 cm or exam-specific sizes. For those, use the ID photo tool, which takes pixel sizes and KB ranges pasted straight from the form.
Sources
- U.S. Department of State, Photo Requirements — travel.state.gov
- U.S. Department of State, Digital Image Requirements — travel.state.gov
- U.S. Department of State, Photo Composition Template — travel.state.gov
- U.S. Department of State, Photo Frequently Asked Questions — travel.state.gov
Square 600×600 JPEG under 240KB, with the head oval and eye band drawn on the frame. Runs in your browser.